Windows Embedded Standard 7: User interface
filters
(Post 4 of 4)
This post is the fourth (and the last) in a series of four posts
that make an article on user interface filters. In particular, we
will deal with:
Dialog box filter
 by using ICE
![clip_image001[1]](/media/2056/Windows-Live-Writer_Windows-Embedded-Standard-7-User-interfa_6EE_clip_image001%5B1%5D_thumb.gif) by using IBW
by using IBW
![clip_image001[2]](/media/2066/Windows-Live-Writer_Windows-Embedded-Standard-7-User-interfa_6EE_clip_image001%5B2%5D_thumb.gif) by using DISM
by using DISM
![clip_image001[3]](/media/2076/Windows-Live-Writer_Windows-Embedded-Standard-7-User-interfa_6EE_clip_image001%5B3%5D_thumb.gif) Let's practice
Let's practice
User interface filters - conclusion of the whole
article
______________________________________________________
Dialog box filter
As we have seen, since the Message Box
is not the only function that allows you to interact with the user,
Microsoft created a new filter that acts at window level.
This filter allows you to define a set of parameters of the
window (e.g.: the process name, the class name and the title of the
window) and the action to be performed before displaying it (e.g.
close, minimize, maximize or a list of buttons). These definitions
are taken over by a service that executes the action that was
chosen just before the window is displayed. It is important to
point out that, to use this filter, you must "know" the window on
which you want to take action.
The filter is obtained through a Windows service based on a
configuration file which, when active, captures all the windows
when they are created. When the application asks for a window
display, the service compares the data with those of the filter
and, if the data match one of the lines of the configuration file,
it performs the planned action.
The configuration file, called
ConfigurationList.XML, is located (by
default) in the system disk, in the folder:
ProgramData\Microsoft\DialogFilter.
To identify the window you want to take action in, you can use
the Windows "Event Viewer" after having enabled the LOG function or
use a tool that is part of the Windows Embedded Studio 7 named
"Dialog Filter Editor" that is (by default) in the folder:
"C:\Program Files\Windows Embedded Standard
7\EmbeddedSDK\bin"
Note:
· In the en-us folder, located in the same path of
DialogFilterEditor.exe, there is a file DialogFilterEditor.exe.mui
that contains the resources necessary for the proper functioning of
the application!
· Do not change (and/or create) the file ConfigurationList.XML
manually, it has to follow a basic pattern provided by
"ConfigurationListSchema.xsd". In practice, it is recommended to
create/modify the file by using the application
DialogFilterEditor.exe, and only in cases where there is real need
to edit it with an XML-editor (UTF-8).
· Security messages (such as UAC = User Account Control) are not
filtered, you should configure security so that it is controlled
automatically without prompting the user. In this way:
o all the maintenance support staff (typically with local
administrator privileges) will be enabled automatically without
further confirmation (pay attention to this choice because it
brings a decrease in security);
o users who need to use the device (typically without local
administrator privileges) will be unable to perform actions that
would need to be confirmed and this situation goes in the right
direction: it limits the user to stay within the choices available
within the application.
Dialog box filter (by using ICE)
The "Dialog Box Filter" (DBF) package is located inside
the "Embedded Enabling Features"
After adding the DBF package in the build, we have these
choices:
· The Path, if loaded, teaches the service where to find the
ConfigurationList.XML file, in order to
successfully intercept the windows. The default path is:
ProgramData\Microsoft\DialogFilter\
· that is a folder with attributes "Hidden + System" of system
disk;
·The triplet: Domain, Username and Password is used to set the
credentials to access the file location (which can be placed inside
the device or in a network location).
It is possible to directly include the
ConfigurationList.XML file in the image
that is being prepared with the configurator (ICE) by placing the
files in the Distribution Share (in our example: DSSP1) recreating
the path that should be in the target device. In our case, assuming
that the folder on the device will be the default:
%SystemDrive%\ProgramData\Microsoft\DialogFilter
we have to put the file in this folder:
%distributionshareroot%\$OEM$
Folders\DialogFilter\$OEM$\$1\ProgramData\Microsoft\DialogFilter\
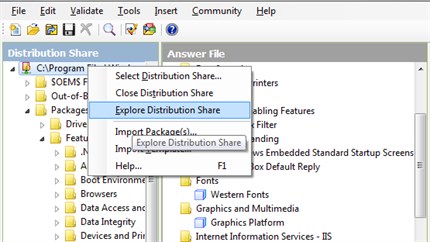
To find where our Distribution Share is:
· Move to the Distribution Share Panel and right click on "the
root";
· From the list, choose "Explore Distribution Share";
· The Configurator (ICE) will display an Explorer Windows on the
DS path.
To create the ConfigurationList.XML
file with the list of the windows you want to manage, run the
DialogFilterEditor while the windows are still
displayed on the screen and choose the action you want to activate
before the windows will be shown next time (see the practice
chapter below).
When you have finished the list, ask the application to
save data in the
ConfigurationList.XML file and copy it in
the path of the $OEM$ Folders as explained
before.
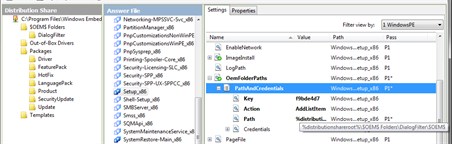
Within ICE we will need to configure the package
OEMFolderPaths
Foundation Core\Windows Embedded
Edition\Setup-x86.
The quickest and safest way to do this is:
· Move to the column of the Distribution Share and open the
folder
$OEM$ Folders;
· double-click on DialogFilter;
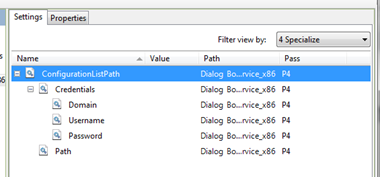
· The configuration environment (ICE):
o will automatically create a new section of
Path&Credentials with the correct data
path;
o will select the filter configuration steps (Filter view by) to
"1WindowsPE";
o will be placed on the created section to allow the inclusion
of credentials.
You get a situation like in the picture:
After completing all the other configurations and validating the
build, you will proceed as usual by asking the environment to
create the ISO image (or directly create the installation media:
USB flash drive or hard disk, CF, etc ...) via
Tools/Create Media/Create IBW Image From Answer
file. At the end of the generation you will see that
the folder created on the developer workstation:
…\AutoUnattend_Files\windowsPE\$OEM$
Folders\DialogFilter\$OEM$\$1
will create the same path on the target, obtaining:
\ProgramData\Microsoft\DialogFilter
with the ConfigurationList.XML
inside.
Note:
· The device so created will start with the installation of the
build, and if we have already prepared all the answers to the
installation questions it will not stop until the installation is
complete.
· If the Dialog Box Filter package is included in the build, as
default, the filter service will start as active.
· Any configuration file modification will take effect only
after a restart of the service.
Dialog Box Filter (by using IBW)
By using the Wizard (IBW), we will simply include the package "
Dialog Box Filter " in the build, and "at run time", we
will operate, with due care, on the registry keys that drive this
filter. With reference to the above variables we have that, to
enable the functionality in its entirety, it requires acting on the
variables of the key:
HKLM\System\CurrentControlSet\services\DialogFilter
\parameters
Here are the keys that may be of interest with their default
values:
…\parameters\ConfigList=%SystemDrive%\ProgramData\Microsoft\DialogFilter\ConfigurationList.xml
…\parameters\ConfigSchema=%SystemDrive%\ProgramData\Microsoft\DialogFilter\ConfigurationListSchema.xsd
…\parameters
\ServiceDll=%systemRoot%\System32\DialogFilterSvc.dll
Once IBW added the service in the system, it will be system
administrator's responsibility, after appropriate tests, to prepare
the MASTER disk for cloning.
Dialog Box Filter (by using DISM)
Let's use the tool DISM (Deployment Image Servicing and
Management) to add the package "Dialog Box Filter" to a
system already built. We can add the package "OnLine" (directly on
a running system).
To obtain this adding operation, follow these simple steps:
1) Check that the package you want to add does NOT have
dependencies on other packages NOT included in the system;
2) Locate the name and the path of the package that you want to
add;
3) Make the package available to the system you want to
update;
4) Run the command to add the package "OnLine".
Let's understand how:
1) Suppose that the original Answer
File of our system has been "Validated", but it did
not contain the Package " Dialog Box Filter ":
2) The package name and its path can be inferred directly from
the Answer File in the line "source
location":
"%distributionshareroot%\Packages\FeaturePack\x86~winemb-dialog-filter~~~~6.1.7601.17514~1.0\winemb-dialog-filter.cab"
a. Open the original Answer File of
our system with the configurator (ICE);
a. Add the package "\FeaturePack\EmbeddedEnablingFeatures\
Dialog Box Filter ";
b. Run the validation of the build;
c. Save this new version of the Answer
File with a different name;
d. Check that the differences between the two are only related
to the addition of the package "Dialog Box Filter " to the
Answer File. There should be only these
"five" lines:
<package action="install">
<assemblyIdentity name="WinEmb-Dialog-Filter"
version="6.1.7601.17514" processorArchitecture="x86"
publicKeyToken="31bf3856ad364e35" language="neutral"
versionScope="nonSxS" />
<source
location=
"%distributionshareroot%\Packages\FeaturePack\x86~winemb-dialog-filter~~~~6.1.7601.17514~1.0\winemb-dialog-filter.cab"
/>
<ew:packageInfo releaseType="Feature Pack"
customInfoVersion="1.0" />
</package>
Or, in the configurator (ICE):
a. move in the middle column (Answer
File);
b. double-click on the package Dialog Box Filter; on
the right panel, the Path element of the folder
Properties will give us the name of the folder
where is the package and its correct name are.
3) Copy the installation file (. CAB) in a place where it can be
reached by the system we want to update (for example, the root
folder of a USB-Key).
4) Suppose that the USB-key above for the system we want to
update is called "E:"
a. Open a command prompt with administrator rights and give the
following command:
dism /online /add-package /PackagePath:E:\
winemb-dialog-filter.cab
The system answers:
Deployment Image Servicing and Management tool
Version: 6.1.7600.16385
Image Version: 6.1.7601.17514
Processing 1 of 1 - Adding package
WinEmb-Dialog-Filter~31bf3856ad364e35~x86~~6.1.7601.17514
A progression bar appears:
[==========================100.0%==========================]
The operation completed successfully.
Restart Windows to complete this operation.
Do you want to restart the computer now (Y/N)?
When the system restarts, it will complete the installation.
Note: If you install the package in this way,
the DialogFilter Service will automatic Start (even if its
ConfigurationList.XML file does not exist yet).
Dialog Box Filter (Let's practice)
To better understand the operation of this service, we have
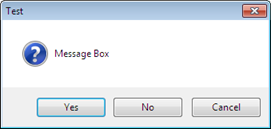
created a simple .NET application, called Test_1,
that displays a Message box named Test with three
buttons: Yes, No and
Cancel (Yes is the default selection) and,
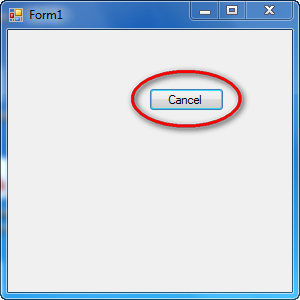
regardless button pressed, it displays a second window, called
Form1 that has only one button with the same text
of button pressed before: even if the first window that appears can
be managed with the Message Box Default Reply (MBDR) it
can also be intercepted by the Dialog Box Filter (DBF).
This can be due to the fact that, using the MBDR is a global
configuration of the system, while the DBF is a targeted
intervention to the specific message.
Let's go down to the practice of our example. First, check that
the DialogFilter
service is NOT active and the registry key to manage the
Message Box Default Reply (MBDR) is NOT enabled in order
to understand how the application evolves without any
filters.
Use the Windows Service manager (Services with
administrator privileges) and stop the DialogFilter
service. Or, by using a command prompt with administration
privileges, type the command:
sc stop dialogfilter
The services will present as follows:
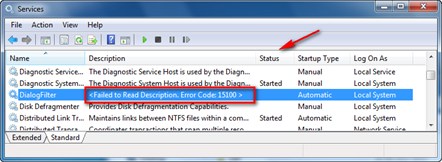
The Error Code 15100 is because the service cannot find its
configuration file;
The status is "stopped" (not Started);
Use the registry editor (Regedit with
administrator privileges) and navigate to the key:
HKLM\System\CurrentControlSet\Control\Error
Message Instrument
set to Zero the value of the enabling filter variable:
EnableDefaultReply=0
NOTE: To use the Administrative Tools on the PC-Target, the
packages that contain them must be included in the build. As for
"Regedit.exe", the package is:
FeaturePack\Management\System Management\System
Management Utilities.
To find the correct package inside the configurator (ICE) you
should:
· use the "Find" (Ctrl-F) function;
· select the option "Search file names in packages";
· search for "Regedit.exe".
With a double click on the row, you will be moved to the column
of the Distribution Share with the correct package selected.
Run Test_1application and obtain:
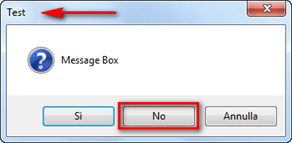
Click on button No in the Message
Box and obtain:
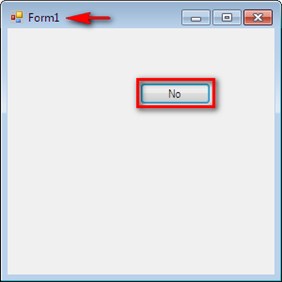
If you click the No button the application
proposes the first Message Box again. You
can try the other buttons on the first screen or close the
application by clicking on the X in the upper right corner of the
Form1 form.
Run again Test_1 application and
remain on the first windows:
Run the application DialogFilterEditor
(with administrator
rights) so that the window you want to intercept is
already being displayed. If you close all the other windows and
make a "refresh" on the application (F5 or Settings/Refresh), there
will be only these two windows:
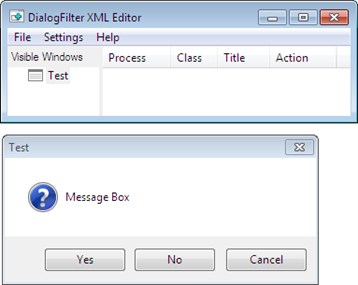
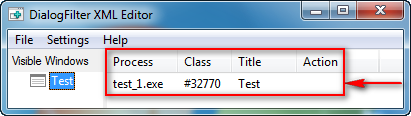
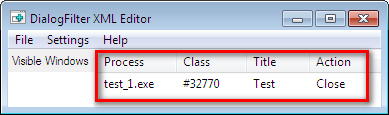
Double-click on the row of the Test on
the list of "Visible Windows" and the application will enumerate
the window information: Process, Class and Title:
Double-click on the name of the process
test_1.exe and the application displays a new
window containing the above information and prompts you to select
the option to use this window: Cancel,
Close, No, and
Yes
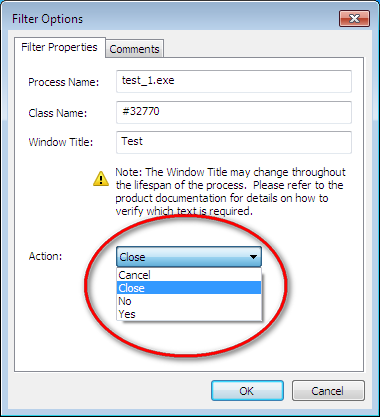
Note: In the action list, as well as buttons on
the standard window close, even those for the Cancel, No and Yes,
are displayed: this gives us the ability to manage the window just
as we need. We can enter in such a detail that, until now, we were
unable to reach. The alternative solution available up to now, was
to "write" a custom filter waiting for the "create window function"
and to manage it before it is displayed.
Select "Close" and then
OK:

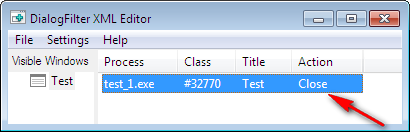
In the Action column will appear:
Close
Now ask to the application
DialogFilterEditor to save the
configuration file (XML) to be able to feed the service: on the
command line select "File" and then "save
as" and a name that will be
ConfigurationList.XML in the path:
%SystemDrive%\ProgramData\Microsoft\DialogFilter.
Here is the content of the .XML file:
<?xml version="1.0" encoding="utf-8"?>
<CL:dialogs xmlns:CL="urn:Dialogs">
<dialog>
<ProcessImageName>test_1.exe</ProcessImageName>
<Title>Test</Title>
<Class>#32770</Class>
<Buttons>
<Button>Yes</Button>
<Button>No</Button>
<Button>Cancel</Button>
<Button>Close</Button>
</Buttons>
<Actions>
<Action>Close</Action>
</Actions>
</dialog>
</CL:dialogs>
Now start the DialogFilter
service and launch the application Test_1.
Use the Windows Service manager (Services with
administrator privileges) and start the DialogFilter
service. Otherwise, by using a command prompt with administration
privileges, type the command:
sc start dialogfilter
Run Test_1 and we will obtain
directly:
We will see directly the second window because the first one has
been filtered by the DialogFilter service
by simulating the pressure of the X button (Close).
Now, let's suppose to intercept and neutralize this second
window: close the application Test_1
andstop the service again:
sc stop dialogfilter (from a command prompt with administrative
right)

Run again the application
DialogFilterEditor (with administrator
rights) and close all other windows and make a
"refresh" on the application (F5 or Settings/Refresh). On the
command line select "file" and
"Open..." and load the
ConfigurationList.XML file from the
%SystemDrive%\ProgramData\Microsoft\DialogFilter
folder and we obtain:
Run again the Test_1 application and
click on the up-right X button (close):

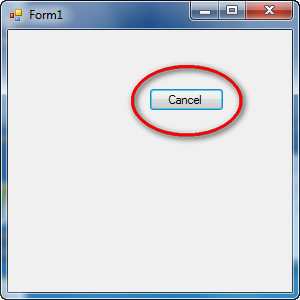
We will obtain the second window (Form1) with
the text button "Cancel":
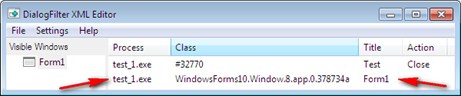
Return to the DialogFilterEditor and,
from the command line, choose "Settings" and
"Refresh", an item Form1 will
appear. Double-click on the row of the
Form1 on the list of "Visible Windows"
and the application will enumerate the window information: Process,
Class and Title:
Double-click on the name of the process
test_1.exe in the line with the "Title"
Form1 and the application displays a new window
containing the above information and prompts you to select the
option to use this window: Cancel,
Close, Maximize and
Minimize
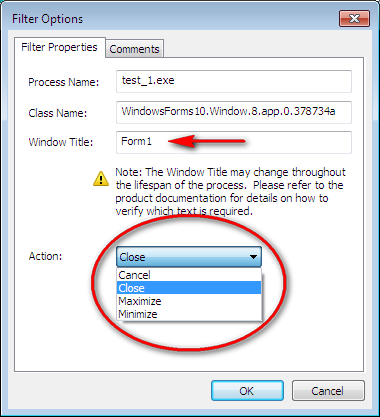
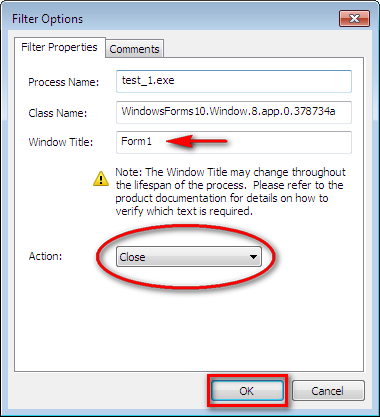
Select "Close" and OK: in the
Action column will appear:
Close

Now ask to the application
DialogFilterEditor to save the
configuration file (XML) to be able to feed the service: on the
command line select "File" and then
"save" (the file name and the path are correct
from last saving operation) and close the
DialogFilterEditor application.
Here is the updated content of the .XML file:
<?xml version="1.0" encoding="utf-8"?>
<CL:dialogs xmlns:CL="urn:Dialogs">
<dialog>
<ProcessImageName>test_1.exe</ProcessImageName>
<Title>Test</Title>
<Class>#32770</Class>
<Buttons>
<Button>Yes</Button>
<Button>No</Button>
<Button>Cancel</Button>
<Button>Close</Button>
</Buttons>
<Actions>
<Action>Close</Action>
</Actions>
</dialog>
<dialog>
<ProcessImageName>test_1.exe</ProcessImageName>
<Title>Form1</Title>
<Class>WindowsForms10.Window.8.app.0.378734a</Class>
<Buttons>
<Button>Cancel</Button>
<Button>Minimize</Button>
<Button>Maximize</Button>
<Button>Close</Button>
</Buttons>
<Actions>
<Action>Close</Action>
</Actions>
</dialog>
</CL:dialogs>
Now start the DialogFilter
service and launch the application Test_1.
sc start dialogfilter (from a command prompt with administrative
right)
Run Test_1 : neither the first windows
nor the second one will be displayed !
User interface filters - conclusion of the whole
article
To protect our application from the system messages and from the
ones arriving from other applications we can use Message Box
Default Reply, turn off the Pop-Up Balloons or appropriately
configure the Dialog Box Filter. With the first two solutions we
get a global change to the system, with the last one we can improve
the granularity of the configuration. This is very effective if we
have to surgically neutralize some windows that appear when you do
not want to, but it becomes a big job if the number of windows to
manage grows up: for example, the buttons text localization could
force us to diversify the configuration file according to the
language used.
____________________________________
These articles, divided into post, were written, revised and
translated into English as well as by me by other two colleagues of
mine: Gianni Rosa Gallina (blog)
eMVP and Marina Sabetta.
For more information please refer to these links (in
English):
http://msdn.microsoft.com/en-us/library/ff793549(v=winembedded.60)
http://msdn.microsoft.com/en-us/library/ff794009(v=winembedded.60).aspx
http://msdn.microsoft.com/en-us/library/ee832759.aspx


